Overview
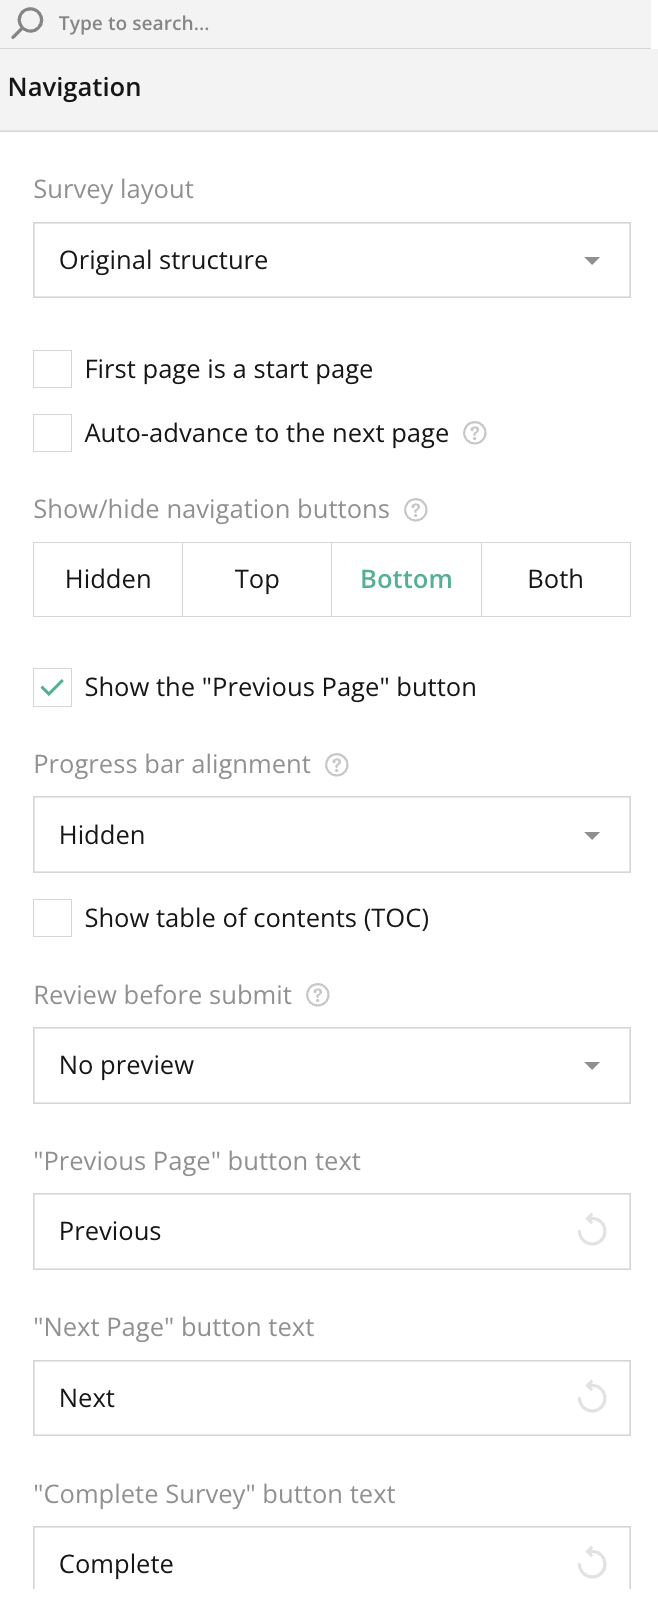
In the Navigation section, users can customize how participants navigate through the survey. This section allows for the configuration of page transitions, button visibility, progress bar display, and more to enhance the user experience.
Key Features:
- Survey Layout:
The Survey Layout setting provides options to control how questions are presented to participants. Based on the layout you choose, the survey will adapt to display questions in different ways to optimize participant interaction.
Available Layout Options:
- Original Structure:
- Displays the survey in its original multi-page format, where each page consists of a set of questions as designed. This layout is useful when there are multiple sections or a clear division of topics.
- Show All Questions on One Page:
- This option combines all the questions into a single page. This is ideal for short surveys or when you want participants to see all the questions at once for faster completion.
- Show Single Question per Page:
- Each question will be displayed on a separate page. This layout is useful for guiding participants step-by-step through the survey, ensuring they focus on one question at a time.
- First Page is a Start Page:
- Enable this option to designate the first page as an introductory or start page. This allows for a dedicated welcome or instruction page.
- Auto-Advance to the Next Page:
- This feature, when enabled, automatically advances participants to the next page after completing a page of the survey, eliminating the need to manually click the “Next” button.
- Show/Hide Navigation Buttons:
- Choose where to display navigation buttons:
- Hidden: No navigation buttons will be shown.
- Top: Navigation buttons appear at the top of the survey.
- Bottom: Buttons appear at the bottom of the survey (default).
- Both: Buttons appear at both the top and bottom of the survey.
- Choose where to display navigation buttons:
- Show the “Previous Page” Button:
- Enable this checkbox to allow participants to navigate back to previous pages. This is useful for surveys where participants may want to review or change their answers.
- Progress Bar Alignment:
- Customize how and where the progress bar appears:
- Hidden: No progress bar is displayed.
- Top/Bottom: The progress bar can be placed at the top, bottom, or both to visually indicate survey progress.
- Customize how and where the progress bar appears:
- Show Table of Contents (TOC):
- Enable this option to display a table of contents for the survey. This is useful for longer surveys, giving participants an overview of the sections or pages they will go through.
- Review Before Submit:
- Allows participants to preview their answers before submitting the survey. Options include:
- No Preview: Submit directly without reviewing.
- Preview Before Submit: Allows participants to review all responses before final submission.
- Allows participants to preview their answers before submitting the survey. Options include:
- Button Text Customization:
- Customize the text on navigation buttons:
- “Previous Page” Button Text: Define what the previous page button will say (e.g., “Back”).
- “Next Page” Button Text: Customize the text on the next button (e.g., “Continue”).
- “Complete Survey” Button Text: Modify the final submission button text (e.g., “Finish”).
- Customize the text on navigation buttons:
Tips for Using the Navigation Section:
- For simpler surveys, consider enabling Auto-Advance to streamline the user experience.
- Display the Previous Page button when participants may need to review or change answers.
- Using a Progress Bar or Table of Contents can enhance the clarity of long or multi-section surveys by helping participants track their progress.
How does the progress bar work?
The progress bar visually tracks the participant’s progress throughout the survey, showing the percentage of pages or questions completed.
Can I change the text on navigation buttons?
Yes, the navigation buttons can be fully customized in terms of their labels using the provided fields.